Wiadomość wysłana przez: Piękny Roman w Lutego 03, 2017, 13:02
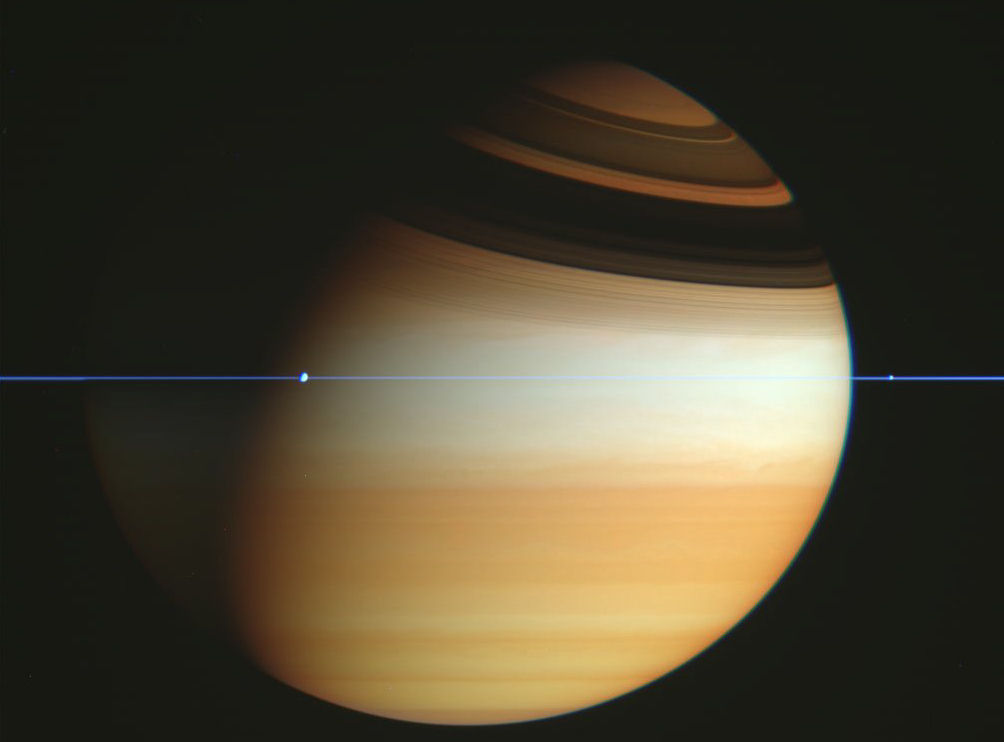 |
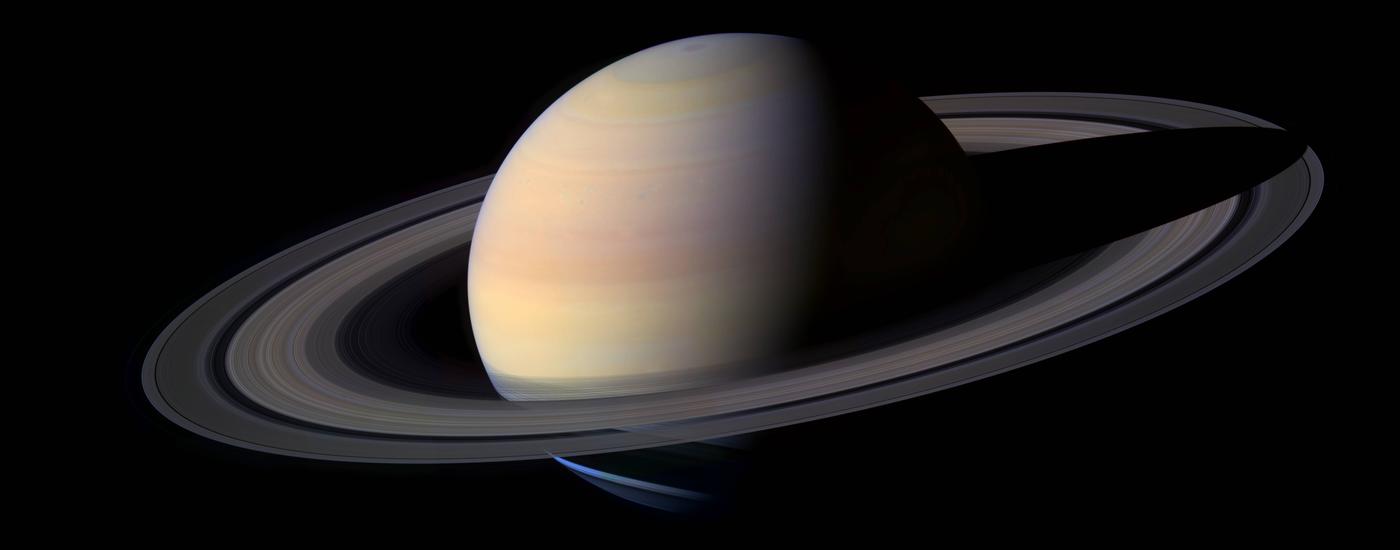
| The glory that is Saturn. The Cassini spacecraft was crossing the plane of the rings as it captured this image, so they are visible only as a sharp thin line running across the center of the image and a complex play of shadows on the planet's northern hemisphere. Image credit: NASA |
There are, of course, the rings. They make Saturn an austere work of art wrought in ice and orbital mechanics. Clarke attributed their creation to the same advanced aliens who uplifted humankind at the beginning of the book and film 2001, three or four million years before Discovery's launch.
There is also peculiar Iapetus - which Clarke called Japetus (the German spelling) - a 1500-kilometer-diameter moon very dark on one side (its leading hemisphere as it orbits Saturn) and very bright on the other. The arrangement of the dark leading and bright trailing hemispheres mean that Iapetus, Saturn's second-largest moon after Titan, is very bright to Earth-based observers when its 79-day orbit puts it on one side of Saturn and very faint roughly 40 days later, when it moves into view on the other side.
Stanley Kubrick, who directed the film 2001, co-authored its screenplay, and received co-author credit on early editions of the novel, also sought to send Discovery to Saturn, but had to settle for Jupiter. The film's overtaxed art department rebelled - Kubrick, ever the perfectionist, was given to demanding quick-turnaround changes which he subsequently threw away. Perhaps more important, a portrayal of Saturn convincing to 1968 film audiences proved too great a challenge for 2001's pioneering special-effects technology and skilled artisans. Had they known how improbable-seeming Saturn really appears, Kubrick and the production crew might have given themselves a bit of slack.
 |
| A raging storm in Saturn's northern hemisphere imaged by the Saturn-orbiting Cassini automated explorer 10 years after 2001. In 1968, observers using Earth-based telescopes believed Saturn's atmosphere to be practically featureless. Image credit: NASA |
In the second installment, I described two versions of Discovery, the "hero ship" of 2001. I emphasized the film Discovery; that is, the open-cycle gas-core nuclear-fission design the film's technical consultant, Frederick Ordway, described in the British Interplanetary Society magazine Spaceflight in 1970.
This post picks up the 2001 story where my first post left off, then I will conclude the series by discussing a paper NASA Glenn researchers Craig Williams, Leonard Dudzinski, Stanley Borowski, and Albert Juhasz first presented in July 2001 and subsequently published as a NASA Technical Memorandum (TM) in March 2005. They describe a fusion-powered spacecraft meant to emulate 2001's Discovery spacecraft. They named it Discovery II.
My first post ended with United States Astronautics Agency (USAA) bureaucrat-astronauts accidentally triggering an ancient alarm system. Radio waves blast from an alien black monolith in the moon's great ray crater Tycho. The film 2001 then skips ahead 18 months, and we get our first look at Discovery, her crew, and their daily routine.
As always, Clarke fills in missing details. The novel describes a host of robotic monitors scattered across the Solar System. Each in turn detects the radio signal from the Tycho monolith. Later we learn that data from the monitors enabled scientists on Earth to determine that the signal was directed at Saturn. In the movie, the signal was, of course, beamed at Jupiter.
Fateful decisions are made at the highest level of the United States government. The ancient Tycho monolith and the signal it aimed at Saturn are to be kept secret, allegedly to prevent cultural shock and mass hysteria.
Preparations for Project Jupiter, the first piloted round-trip journey to the Solar System's largest planet, are by this time well advanced; this provides an opportunity. In search of those who received the Tycho monolith signal, the Jupiter ship Discovery will instead travel one-way to Saturn with a gravity-assist flyby at Jupiter to gain speed. I describe the development of gravity-assist spaceflight in my "The Challenge of the Planets" post series; please see the "More Information" links at the bottom of this post.
Discovery's crew of six is split up. A separately trained three-man "survey crew" will travel to Saturn in hibernation; they will thus remain safely incommunicado, ensuring that the mission's true purpose does not slip out during radio communications with Earth. Mission Commander David Bowman and his deputy, Frank Poole, will remain awake. The pair form a minimal caretaker crew during the interplanetary phase of the Saturn mission.
Bowman and Poole are told that their mission aims to expand knowledge of the Solar System and to extend space technology capabilities, and that the survey crew has been placed aboard Discovery in hibernation to conserve life support resources. Hibernation development is a major goal of their mission, for after 100 days of scientific exploration at Saturn the entire human crew is scheduled to hibernate for more than five years. Eventually, the as-yet-unbuilt spacecraft Discovery II will arrive to take them home.
The NASA Glenn Discovery II has no connection with the Discovery II crew-retrieval spacecraft of the novel 2001. Clarke barely describes the latter. I encourage readers to speculate on the shape and capabilities of the Discovery II in the 2001 universe.
The sixth member of the Discovery crew, the HAL 9000 computer, is an artificial intelligence (AI). HAL 9000 knows the true purpose of the trip to Saturn; it is, however, programmed not to tell Bowman and Poole. The secrecy order creates a terrible behavioral conundrum for HAL 9000. Deep in its programming is a directive never to distort information, yet it has been commanded to do just that. This weighs heavily on the advanced AI. HAL 9000 is an innocent being, unable to tamp down what amounts to its conscience. The conflicting directives drive HAL 9000 to neurotic behavior which exacerbates the internal conflict, leading to psychosis and murder between Jupiter and Saturn.
Following the deaths of Poole and the three hibernating crewmen, Bowman is left alone aboard Discovery with HAL 9000. For his own safety, he disconnects the AI. When he finishes, he is the only conscious being within a billion kilometers.
Mission Control belatedly tells Bowman the true purpose of Discovery's mission. He begins a program of study to prepare himself for whatever he will encounter at Saturn. Without HAL 9000 to monitor him in hibernation, his has become a true one-way mission. Increasingly intrigued (and not a little daunted) by the prospect of contact with highly advanced aliens, Bowman is, however, able to put aside thoughts of a lonely death far from home. He even sympathizes with HAL 9000's plight.
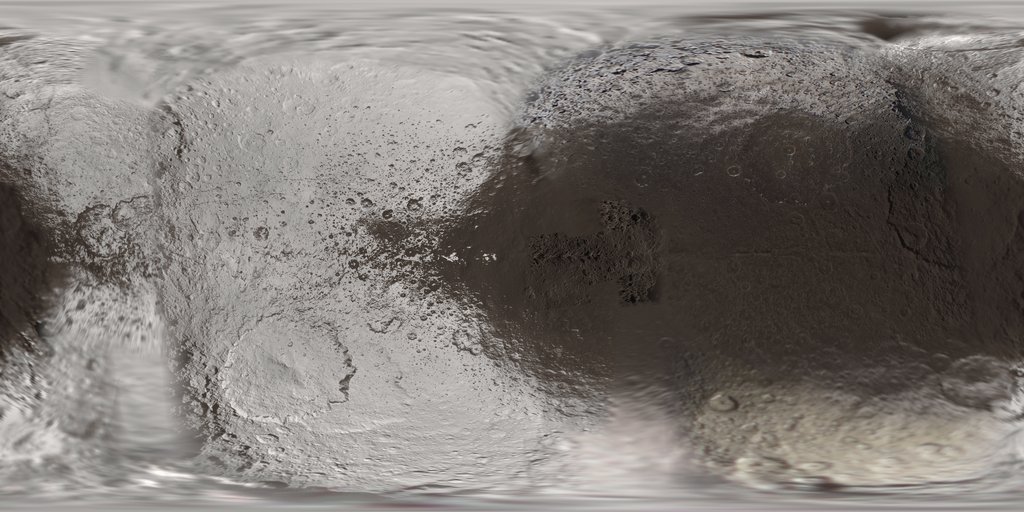 |
| The real thing: cylindrical projection of Iapetus image mosaic. The Cassini spacecraft captured images of Iapetus during flybys at different distances and under different lighting conditions; hence some are blurred and others are sharp. The leading hemisphere is at right. Image credit: NASA |
The big monolith has plans for Bowman; it is, among other things, a Stargate, a space-time shortcut leading into a galactic transit system. He is soon whisked across the Milky Way Galaxy to meet an enigmatic fate. I do not feel qualified to describe the intricacies of Stargate technology, so here I will conclude my overview of the second half of the novel 2001.
 |
| Discovery II: this forward view highlights the artificial-gravity section and the spacecraft's lone docking port. Image credit: NASA |
In their documents, the NASA Glenn team describes Jupiter and Saturn versions of its Discovery II. As shown by their estimated weights, only minor differences distinguish the two versions; at 1690-metric-tons, the Jupiter-bound Discovery II would weigh only nine metric tons less than the Saturn-bound version. In keeping with my already-established emphasis on Saturn in this post, I have opted to focus on the Saturn version of NASA Glenn's Discovery II.
The Discovery II design was hatched while an obscure NASA study group called the Decadal Planning Team (DPT) was active. A creation of President William Clinton's Office of Management and Budget, the DPT aimed to articulate a philosophical foundation for NASA advance planning in the 21st century. It did this to prepare the way for new space initiatives during the Presidency of Clinton's Vice President and "space czar," Albert Gore.
"Go anywhere, any time" was an oft-repeated DPT slogan that seems on the face of it to apply well to NASA Glenn's Discovery II. The spacecraft's fusion rocket could in theory propel it to Saturn in 212 days when the planet was at opposition - that is, when Saturn was as close to Earth as it could be. The NASA Glenn team found that, all else being equal, a Saturn voyage at conjunction - that is, when Saturn was on the far side of the Sun and thus as distant from Earth as it could be - would last only 15% longer. Discovery II's course to Saturn in both instances would follow nearly a straight line, not the graceful rising curve of a minimum-energy Hohmann transfer.
At present, nuclear fusion occurs mainly inside stars. Human efforts toward harnessing star power since the 1940s have emphasized fusion bombs. The U.S. exploded the first such weapon in 1952; a nuclear-fission device served as the "spark plug" for triggering the fusion explosion.
Development of electricity-generating fusion reactors, by contrast, has turned out to be more difficult than once assumed. The international ITER project, based in southern France, now hopes to test a prototype commercial fusion reactor in the 2030s.
Earth-based fusion electricity-generation technology would need to advance and considerable additional investigation into almost all engineering aspects of fusion rocketry would be necessary before a fusion engine could become part of NASA's spaceflight tool kit. Nevertheless, the NASA Glenn engineers optimistically predicted that Discovery II's maiden voyage might take place 30 years after they completed their NASA TM - that is, in the year 2035.
 |
| Discovery II: this aft view highlights the spheromak fusion reactor, four slush hydrogen tanks, and magnetic rocket nozzle. Image credit: NASA |
Though the NASA Glenn team took pains to make her propulsion reactor as light as possible, at an estimated 310 metric tons it was still the most massive single hardware element of the Discovery II. The reactor weight estimate did not include support systems such as the fission reactor and battery bank that would supply the electrical power necessary for fusion reactor startup.
 |
| Tokamak vs. spheromak. Image credit: Culham Centre for Fusion Energy |
Nuclear fusion brings together atomic nuclei at high temperatures and pressures. Lightweight nuclei, such as those of various isotopes of helium and hydrogen, yield the most energy per unit, so are generally favored as reactor fuel. When atomic nuclei fuse, they release prodigious energy and create heavier elements. The heavier elements would, over time, build up in Discovery II's fusion plasma, gradually reducing the reactor's performance. In addition, some small portion of the spheromak interior walls would sputter away and mix with the swirling plasma.
Heavy element and wall debris plasma (informally known as "ash") would congregate in a "halo" against the outer wall of the plasma torus through skillful management of interlaced "toroidal" and "poloidal" magnetic fields, then a gutter-like magnetic "divertor" would vent the ash plasma from the aft end of the torus. The vented ash plasma would produce thrust.
The NASA Glenn team proposed increasing that thrust by augmenting the vented ash plasma flow with hydrogen. Contact with ash plasma and passage through a constricted "throat" would heat the hydrogen until it also became plasma. A skeletal "magnetic nozzle" would then expel the plasma mix into space to generate thrust. The divertor and magnetic nozzle would together have a mass of only six metric tons, the NASA Glenn team estimated.
Discovery II would include four cylindrical 37-meter-long propellant tanks containing a total of 861 metric tons of "slush" hydrogen. Chilling the hydrogen until it became slush using an on-board refrigeration system would increase its density, reducing the size and number of hydrogen tanks required.
Two authors of the 2001 and 2005 Discovery II documents - Borowski and Dudzinski - proposed in 1997 a different kind of propulsion plasma augmentation. I described this in the first post of this three-part series (see "More Information" below). Their system had lunar liquid oxygen, or LUNOX, augment hydrogen plasma expelled from a nuclear-fission reactor. The hydrogen plasma and LUNOX would burn as in a chemical-propellant rocket engine, increasing thrust and making possible 24-hour Earth-moon "commuter" flights.
To place its Discovery II fusion ship into space, the NASA Glenn team postulated the existence of a Heavy Lift Launch Vehicle (HLLV) capable of boosting 250 metric tons into a circular assembly orbit between 140 and 260 nautical miles above the Earth. They argued that 250 tons would be very near the practical maximum payload for an HLLV. Placing Discovery II components into assembly orbit would require that seven of the monster rockets launch in rapid succession. This would create challenges in the areas of HLLV assembly, pad installation, and launch operations, among others.
The Discovery spacecraft of the book and film 2001 included large-diameter propulsion and crew modules. The latter was a sphere a little over 12 meters in diameter and the former was even longer and wider. The NASA Glenn team looked upon these with skepticism; such modules would likely be too large to launch intact, so would need to be at least partly built in space by spacewalking astronauts or through complex teleoperations.
They ignored the versatile space pods portrayed in the book and film 2001, which might have made orbital assembly easier, opting instead for pre-assembled launch packages that would fit within a 10-meter-diameter, 37-meter-long streamlined HLLV payload fairing. The self-propelled launch packages would, they explained, rendezvous and dock automatically in assembly orbit.
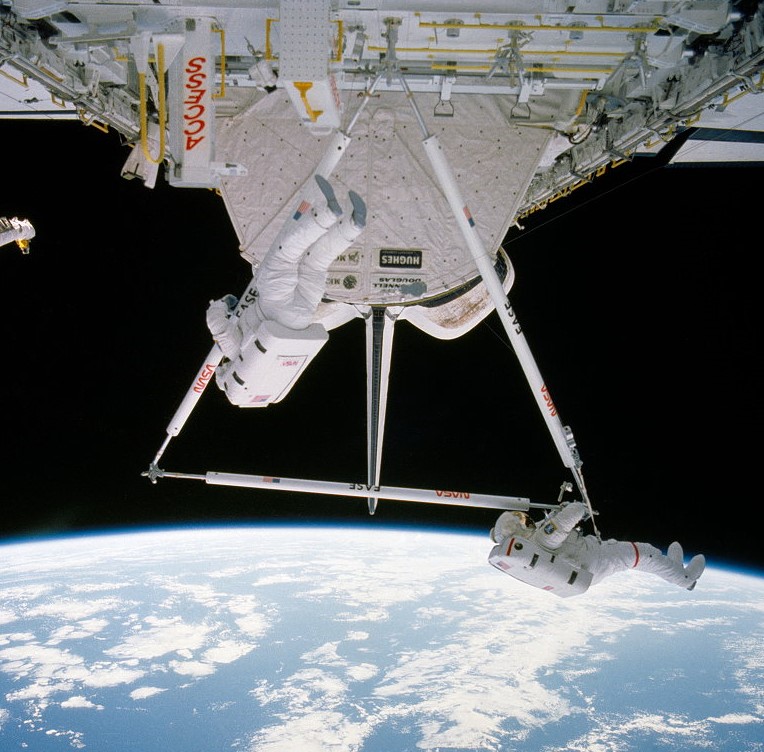 |
| EASE assembly experiment, 1985. Image credit: NASA |
The Discovery II truss, hexagonal in cross section, would comprise 58 "bays," each built from 97 separate struts, nodes, and other parts. EASE assembly occurred in the payload bay of the Space Shuttle Atlantis. Discovery II central truss assembly would apparently take place in open space.
Following truss assembly, spacewalking astronauts would install a wide variety of systems inside and outside the truss. Most obvious were 20 rectangular 25-meter-long radiator panels for cooling Discovery II's electricity-generation systems. Each would reach orbit folded like an accordion.
Most important for the six remaining HLLV flights of the assembly phase would be communications, avionics, and reaction control systems. The avionics system, linked to controllers on Earth through the communications system, would use the hydrogen-fueled reaction control system to keep the truss and its attached payloads stable in orbit so that subsequent payloads could dock with it.
The HLLV's 250-metric-ton weight limit required that the 310-metric ton reactor reach space in two launches. The NASA Glenn engineers proposed launching part of the fusion reactor - its poloidal magnetic coils - with the truss payload. This meant that spacewalking astronauts would need to piece together in space Discovery II's most complex and important hardware element.
The second HLLV payload would include the remainder of the fusion reactor and the magnetic rocket nozzle. The third - the 172-metric-ton "artificial gravity crew payload" - would comprise seven pressurized crew modules. The NASA Glenn team offered no information as to how the crew modules would join together automatically in assembly orbit. The fourth through seventh payloads would each comprise a filled slush hydrogen propellant "cryo-tank." Thrusters and avionics would permit them to maneuver into place near Discovery II's tail.
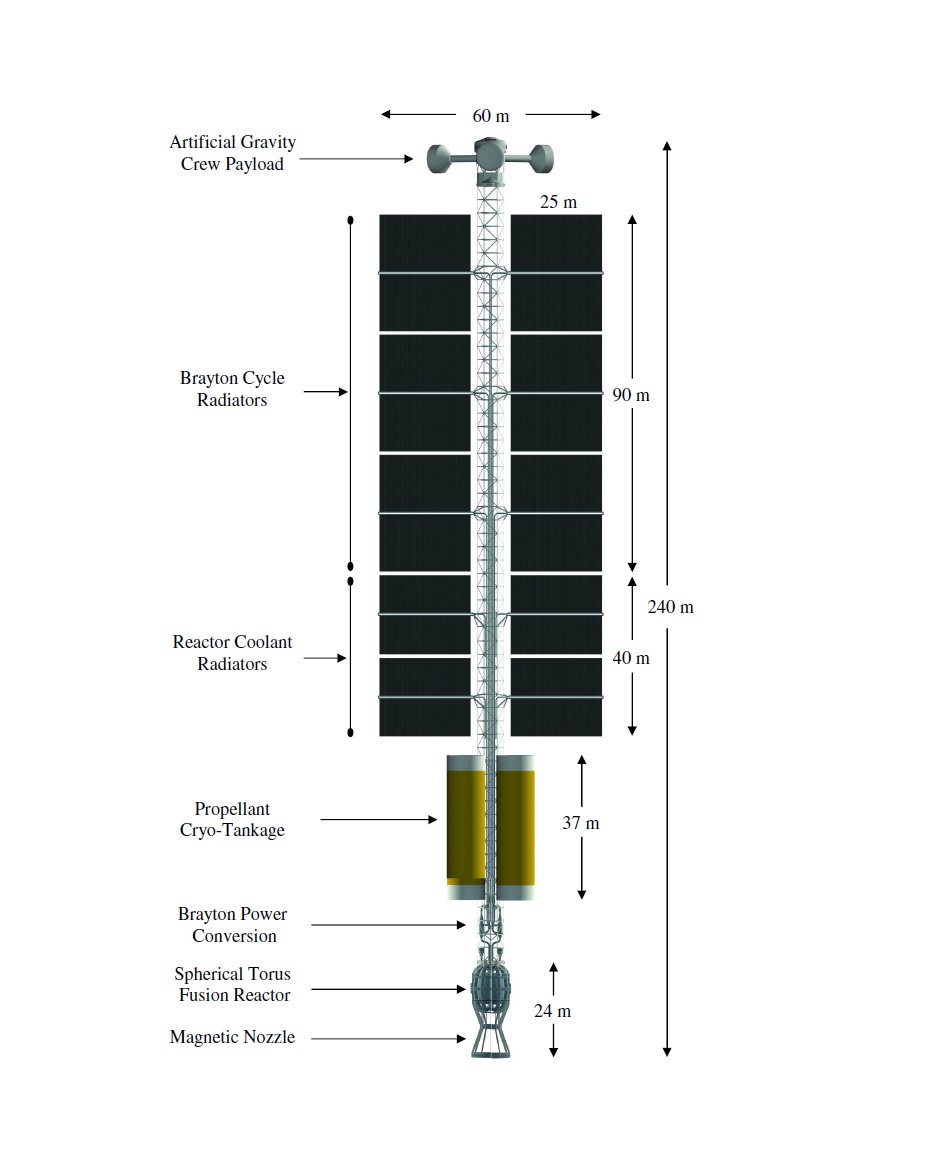 |
| Discovery II with selected components and dimensions indicated. Click on image to enlarge. Image credit: NASA |
The NASA Glenn engineers stated that an air-breathing space plane would deliver a six-to-12-person crew to a space station in low-Earth orbit. There they would board a taxi vehicle for the journey to the waiting Discovery II. They would dock with Discovery II's only docking port, located on the front of her central hub crew module, and transfer to Discovery II.
Crews returning from Saturn would park the spacecraft in sub-parabolic orbit and await retrieval. Discovery II would be designed for reuse, though how she would be refueled, resupplied, and refurbished in sub-parabolic orbit after each flight was left to the reader's imagination.
Preparation for departure, much of which could occur before the crew arrived, would require weeks. The magnets and reactor structure would need to be thoroughly cooled using liquid helium, though the chief reason for the long preparation period would be the need to charge a five-metric-ton nickel-hydrogen battery bank. A two-megawatt, 10-metric-ton auxiliary fission reactor inside the central truss would slowly charge the batteries in preparation for the roughly one-gigawatt burst of radio-frequency energy needed to start fusion in the reactor. The NASA Glenn team called this start-up technique "high harmonic fast wave heating."
D/He-3 fuel would enter the reactor rather spectacularly as one-gram, 2.2-centimeter cube-shaped "pellets" accelerated at a rate of 27,580 gravities inside a 185-meter-long electromagnetic rail-gun. How the long, complicated rail-gun would be assembled in space within the central truss was not described. The solid-deuterium/liquid-helium-3 pellets would enter the reactor moving at 10 kilometers per second, so would deeply penetrate the dense plasma torus. This would help to preserve the stability of the swirling plasma flow. Pellets would need to be injected into the reactor once per second to maintain reactor energy output.
Swirling plasma in the fusion reactor torus would at start-up torque (twist) the central truss. Discovery II's maximum acceleration would reach 1.9 milligravities as she closed in on her target planet, when her cryo-tanks would be nearly empty. This acceleration, though minute, would place strain on the central truss, as would operation of various turbines and the movement of coolant and working fluids through pipes and pumps. The reactor fuel injector would generate a four-gravity load each time it fired a pellet. The NASA Glenn team suggested that a flywheel might absorb some of the forces Discovery II would place on herself, but provided little information as to how this would function.
The revolving crew section would also place strain on the truss. Though they noted that data concerning a healthful level of artificial gravity do not yet exist, NASA Glenn team opted to provide Discovery II's astronauts with artificial gravity one-fifth as strong as Earth gravity. Three arms 17 meters long would each connect a 5.6-meter-tall, 7.5-meter-diameter lab/hab module to a 7.5-meter-diameter central hub where weightless conditions would prevail. The artificial-gravity system would spin 3.25 times per minute. The two-deck lab/hab modules would contain accommodations for four astronauts each. Opting for separate lab/hab modules connected only through a hub would mean that the "hamster wheel" jogging routine demonstrated in the film 2001 could not occur.
All crew modules would include a layer of water between two layers of graphite epoxy hull material for radiation protection and to serve as a heat dump for crew module thermal control. The central hub would also contain a solar-flare storm shelter with augmented shielding.
Discovery II would arrive at Saturn - more accurately, Saturn sub-parabolic orbit - with nearly empty cryo-tanks. Her crew would carefully shut down her fusion reactor and begin charging her battery bank for another start-up in several weeks' time.
The NASA Glenn team offered a vague vision of how their ship might refuel for the trip home to Earth. Robotic fuel-gathering systems, perhaps suspended from balloons, might be placed into Saturn's atmosphere. They would need to process hundreds of kilograms of gas to obtain a single gram of helium-3 or deuterium and tens of thousands of tons to collect the 11 metric tons required to refuel Discovery II.
No indication was given as to how or when the refueling infrastructure would have been established. Similarly mysterious was how the collected D/He-3 would reach Discovery II.
Hydrogen propellant would be more plentiful than either deuterium or helium-3. The NASA Glenn team envisioned that Discovery II's self-propelled hydrogen cryo-tanks would separate and maneuver to an automated refueling station; meanwhile, identical full tanks would rendezvous with Discovery II and replace the depleted ones. How and when the hydrogen refueling station would have been established and how it would collect hydrogen at Saturn was left to the imagination.
Discovery II would carry no auxiliary craft, so would need vehicles pre-deployed at Saturn if her crew was meant to leave the ship and land on any of the ringed planet's many moons. The NASA Glenn team did not explain how auxiliary craft might reach Saturn ahead of Discovery II, nor how they would be maintained after they became based in Saturn's neighborhood.
Could NASA Glenn's Discovery II replicate the capabilities of 2001's Discovery? As detailed in the second part of this three-part post series, the film Discovery differed from the Discovery of Clarke's novel. The cinematic and literary spacecraft had different propulsion systems, though both relied on nuclear fission. Discovery of the film was a gas-core nuclear-thermal rocket; Discovery of the book employed electromagnetic "plasma jets" that drew electricity from a fission reactor.
Both of 2001's Discovery spacecraft - admittedly fictional, but designed with great concern for realism - could travel round-trip to Jupiter without reliance on pre-deployed assets. Both were adaptable enough that they could be diverted from Jupiter to Saturn when the need arose. That adaptability was based on advanced crew support (hibernation) and automation (HAL 9000) systems. Because of those advanced non-propulsion systems, the round-trip Jupiter mission could be re-planned as a one-way Saturn mission with eventual crew retrieval by a second spacecraft.
Though it promised fusion rocket capability, the NASA Glenn Discovery II design study is in fact incomplete. Among other things, its failure to account for the existence at Saturn of extensive pre-deployed assets essential to Discovery II's mission plan makes it hard to take seriously. Furthermore, it emphasizes propulsion to the exclusion of other potentially ground-breaking, mission-shaping technologies. For these reasons, NASA Glenn's Discovery II cannot be said to replicate the capabilities of the Discovery spacecraft portrayed in the book and film 2001: A Space Odyssey.
 |
| Saturn viewed by the Cassini spacecraft from an orbital position north of the planet's equator. The gray north polar region and peculiar spinning hexagonal polar vortex at its center are just visible. Image credit: NASA |
Could the Space Voyages in the Film and Novel "2001: A Space Odyssey" Really Happen? (Part 1)
Could the Space Voyages in the Film and Novel "2001: A Space Odyssey" Really Happen? (Part 2)
The Challenge of the Planets, Part Three: Gravity
Sources (please also see Part 1 and Part 2 Sources)
Realizing "2001: A Space Odyssey": Piloted Spherical Torus Nuclear Fusion Propulsion, NASA/TM-2005-213559, C. Williams, L. Dudzinski, S. Borowski, and A. Juhasz, NASA Glenn Research Center, March 2005
2001: A Space Odyssey, Arthur C. Clarke, New York: New American Library, October 1999, pp. 80-82, 85-101, 120-203
Source: Could the Space Voyages in the Film and Novel "2001: A Space Odyssey" Really Happen? (Part 3) (http://)